Lift Up Conditional
Contents of this page:
Using the “Lift up Conditional” refactoring technique to detangle complex if statements
This is a powerful, satisfying and almost magical refactoring technique. It’s really useful for detangling complex knots of if statements. Llewelyn Falco came up with the technique [!Check this! I think that’s what Llewelyn told me, but we were talking about something else at the time and I didn’t verify if this is what he meant], and Emily Bache named it. There’s a good video by Emily demonstrating the technique here.
The basic principle is to find conditions that are repeated throughout the code and then “lift them up” so that each condition has its own dedicated branch of the code. The result is that we can replace the original complex if statement with a switch statement. Once we’ve done that, we can replace the switch statement with polymorphism (see Replace Conditional With Polymorphism).
In this learning hour we demonstrate the technique, and then let the participants try it out for themselves. You can do this in one hour, but as the technique takes a bit of time to really understand, it’s a good idea to repeat the exercise again in a second learning hour.
This slide deck (also available as a pdf) contains all the resources on this page plus more - many of which may be useful in preparing for this learning hour.
Session Outline
- 10 min connect
- v1: Divide into pairs, if-parsing exercise
- v2: Favourite keyboard shortcuts
- 15 min concept: Demo lift up conditional
- 30 min concrete: lift up conditional in pairs
- 5 min conclusion: Reflect on what’s been learnt
Connect v1: If-parsing exercise
This exercise works well if only doing one hour, otherwise use it for the first of the two hours.
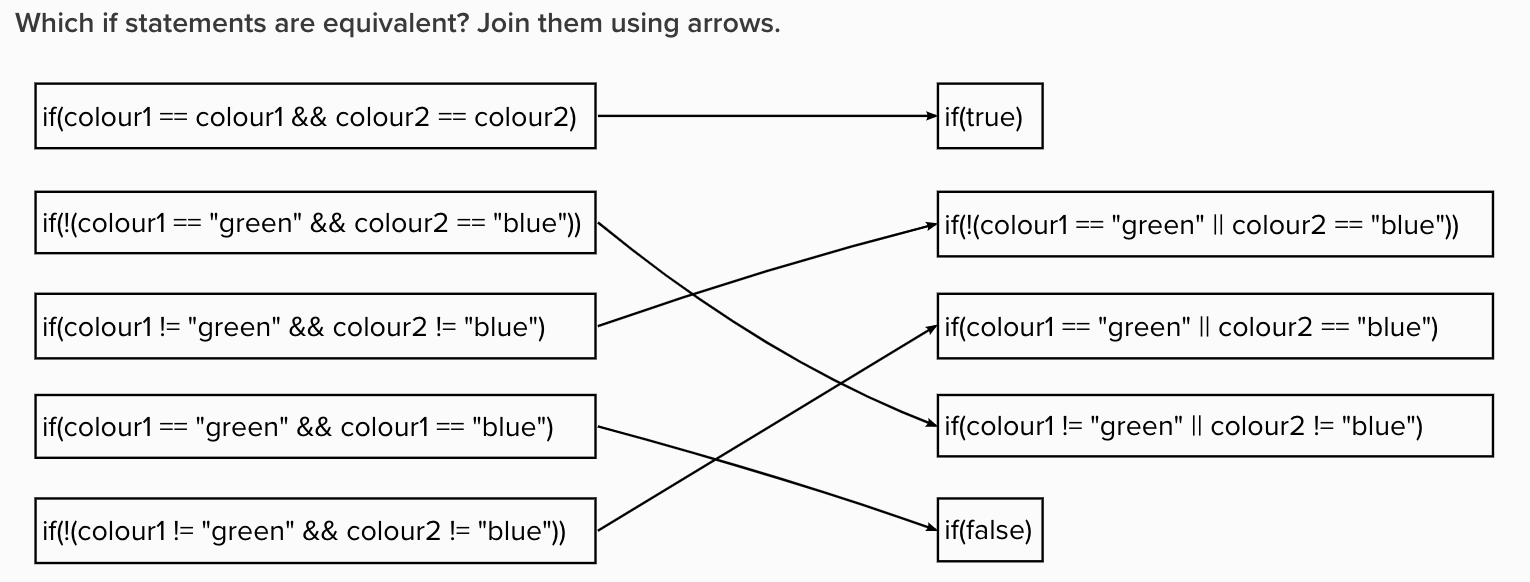
In pairs: Which if statements are equivalent? Join them up. Because they are about to parse and detangle a complex nested if statement, this is a good exercise to get them used to thinking about conditional logic.
Below are the if statements I use, each statement paired with the correct answer. You can use a visual tool like Miro or Mural to join text boxes with arrows, or print them out on paper, or find another technique that fits your situation.
// First pair
if(colour1 == colour1 && colour2 == colour2)
if(true)
// Second pair
if(colour1 == "green" && colour1 == "blue")
if(false)
// Third pair
if(colour1 != "green" && colour2 != "blue")
if(!(colour1 == "green" || colour2 == "blue"))
// Fourth pair
if(!(colour1 != "green" && colour2 != "blue"))
if(colour1 == "green" || colour2 == "blue")
// Fifth pair
if(!(colour1 == "green" && colour2 == "blue"))
if(colour1 != "green" || colour2 != "blue")
Below is a sample of what the solution looks like in Mural. I suggest that, if using a tool like Mural or Miro, you create a separate frame for each pair to use for the exercise.
Connect v2: Favourite keyboard shortcuts
As a whole group, ask participants to answer the question “What are your favourite keyboard shortcuts in [insert relevant IDE, eg Visual Studio]?”
You can ask them to write their answers on stickies using a tool like Miro, Mural or Jamboard, or in bullet points in a shared doc, or on actual stickies in person.
This is a good exercise to get them thinking about keyboard shortcuts, which witruell be useful in this exercise and are demonstrated in the videos linked to below. Hopefully some of them will learn new shortcuts as a result of this exercise.
Concept: Lift up conditional demo
I find it helpful to use schematics to visualise what’s happening, as if you haven’t seen the technique before it can be confusing at first. I also show the Gilded Rose code before and after, to show what we’re aiming for and get them primed for what I’m about to demonstrate.
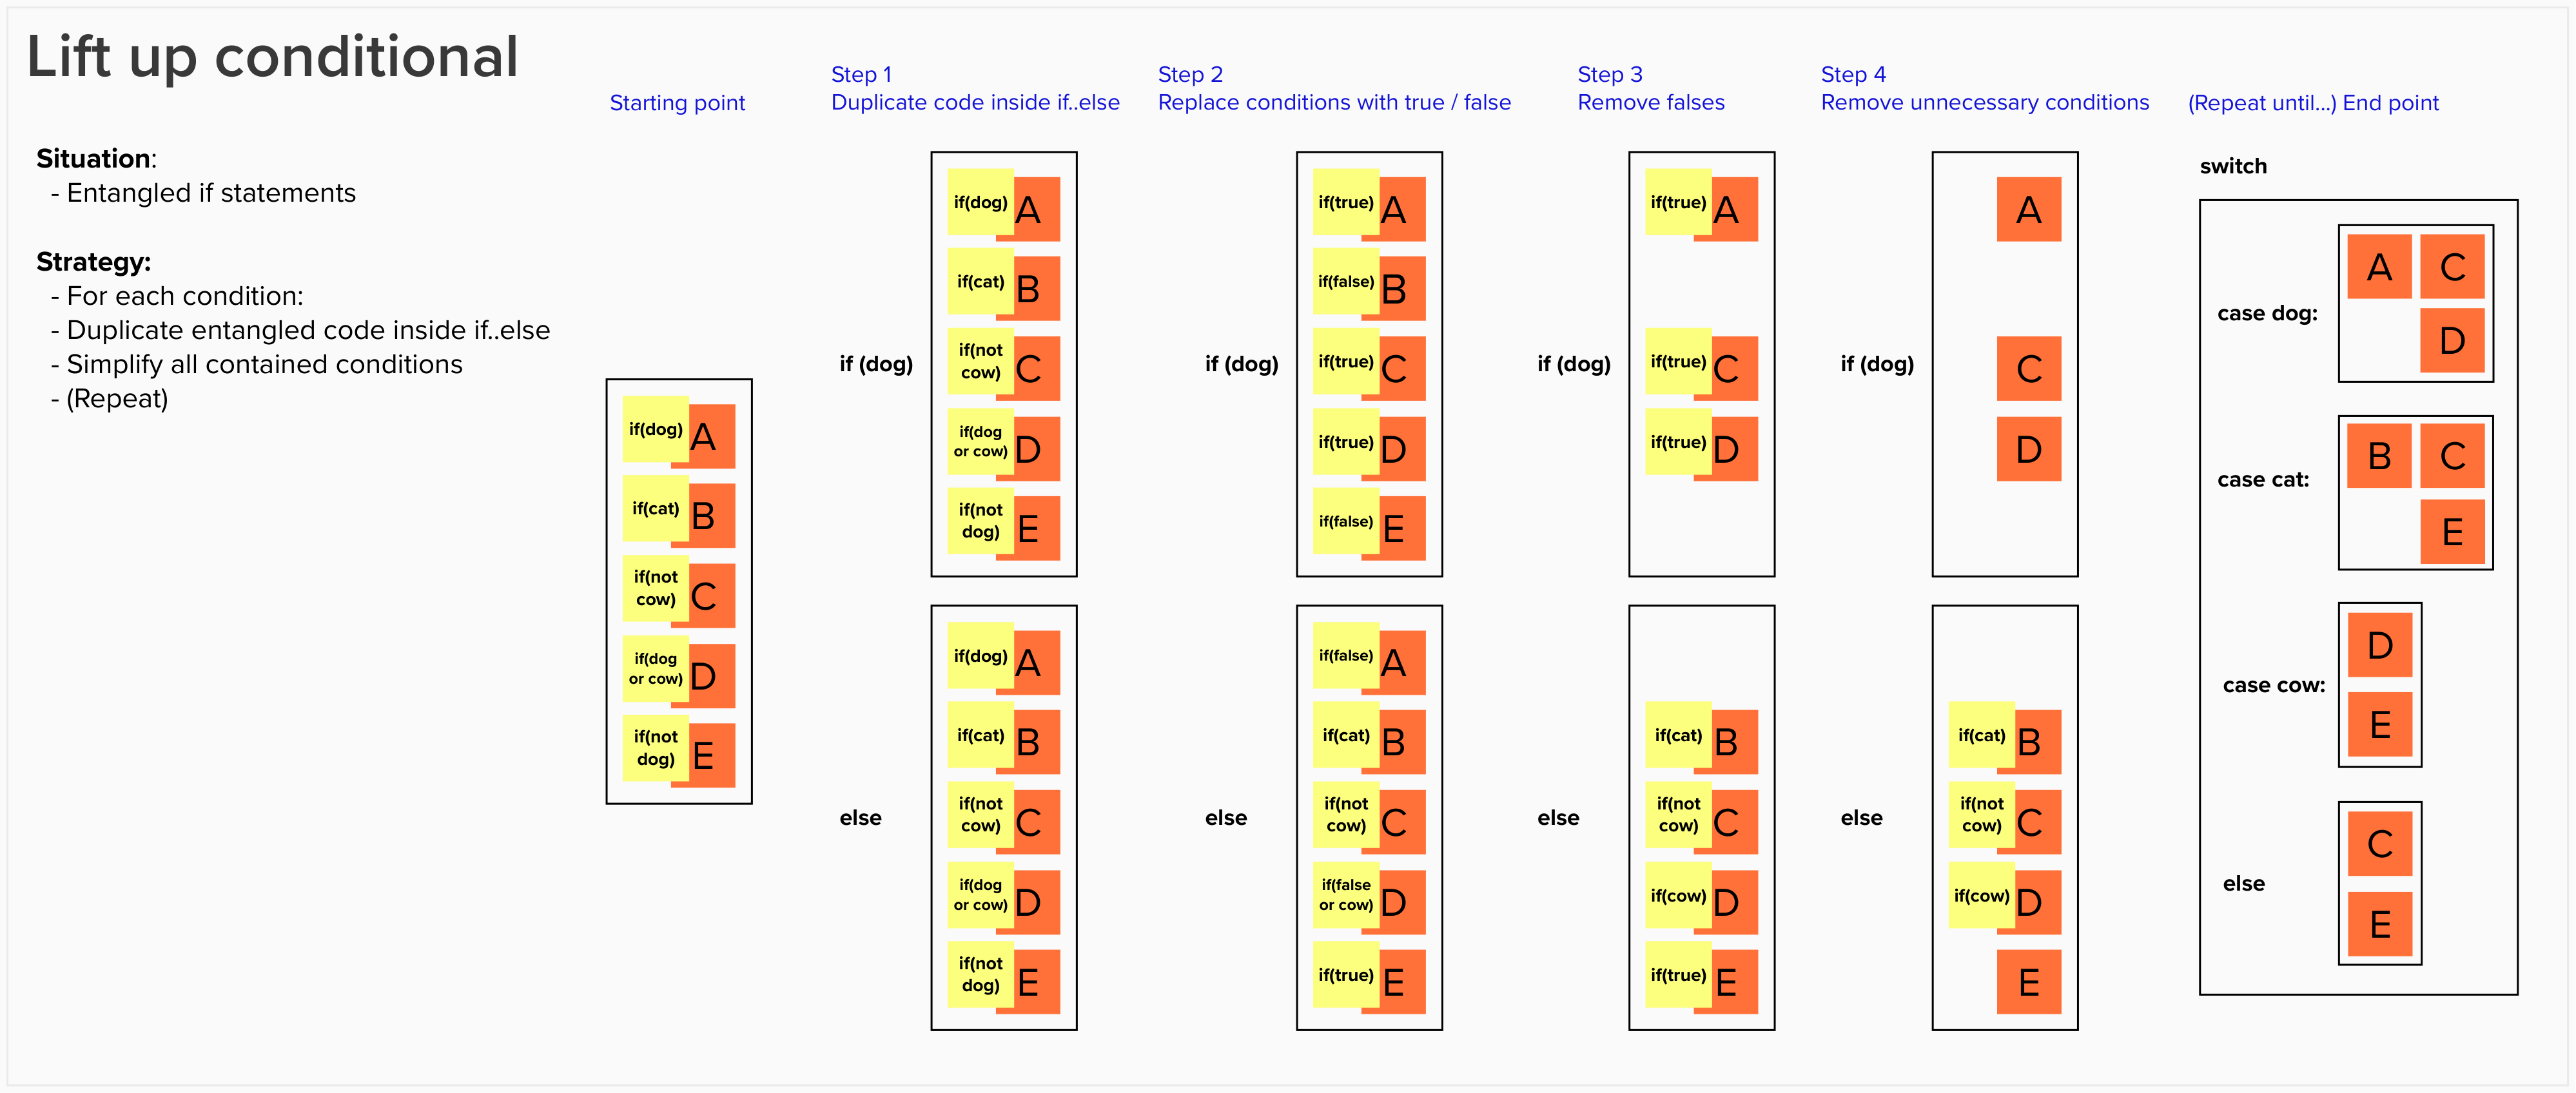
This slide deck (also available as a pdf) contains two versions of the schematic above, as well as a more detailed example using the same principle. I recommend only using the more detailed version if you are planning to devote two learning hours to this activity. Even then, you may prefer the shorter simpler version.
I follow the schematics with this video of a C# demo of the technique, played at double speed, with me talking over the top. This branch of the Gilded Rose kata contains a commit for every step I made in the video. The tests were passing at each commit. There is also this video of Emily Bache demonstrating the technique in Java, but it’s quite long so you might want to make your own or select only some short snippets to show.
Concrete: Do lift up conditional
In pairs, ask them to attempt the technique themselves on the Gilded Rose code base. Encourage them to move in small steps and make sure the tests pass after each tiny change. For C#, I give them this starting point. I did the following, which got them moving as quickly as possible:
- All other languages have been removed from this branch, to avoid distraction and make it clear where to start
- The approval tests are set up for maximum coverage and will pass as soon as they open the code
- Participants downloaded the code and made sure they could build it and make the tests pass before we started the workshop (I have notes here on how to handle any Visual-Studio-related gotchas)
I also added the above schematic and these instructions on using the approval tests to a central location (a Mural board and a Google doc) which all participants could access.
Conclusion: Reflect on what’s been learnt
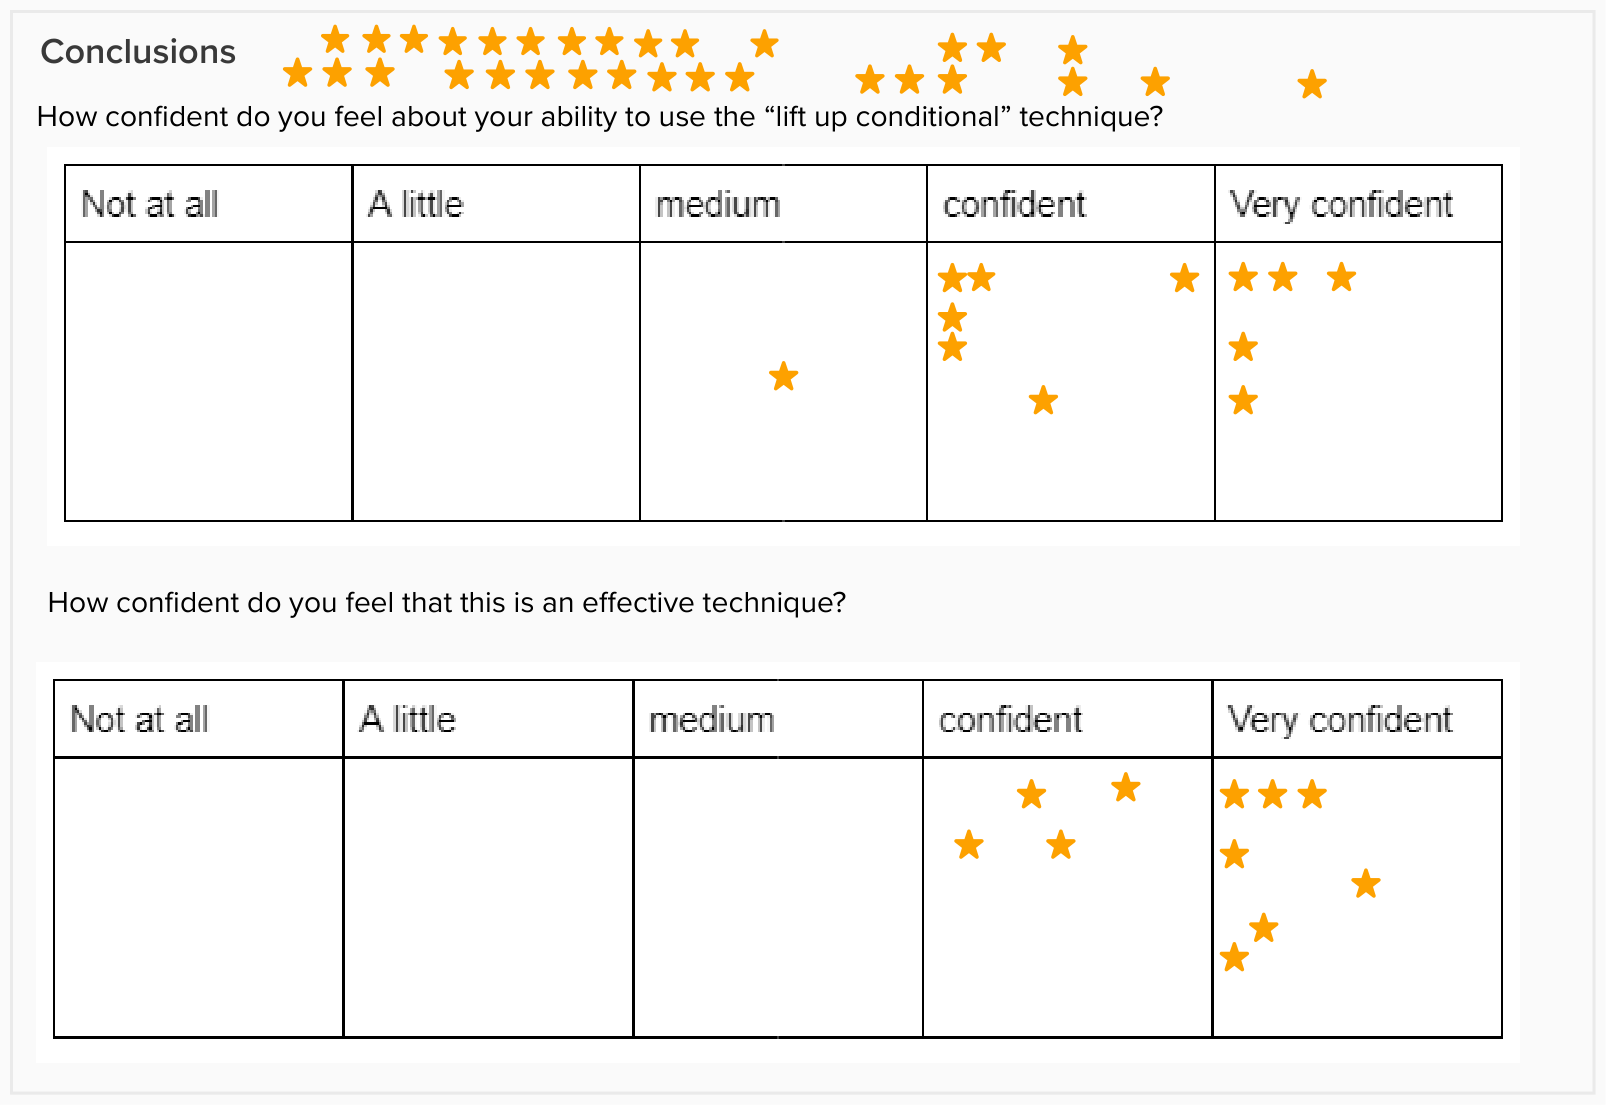
Ask the two simple questions below, and give partipants some simple way of choosing from the multiple choice answers (I created several yellow stars that participants could pick up and move into the relevant space - see image below). This gives you an idea of how well the learning hour has gone, and also gives participants a way of reinforcing in their own heads the value of the workshop.
License: CC-BY-SA-4.0. Attribution: Clare Sudbery, Xavi Ametller - sammancoaching.org